Just to let everyone know Gordon has started posting on shop blog and I'm sure it will be worth you while to keep an eye on it.
He is having a Clearence Sale adding things every week but to benefit you must visit the shop, sorry no sale items on online shop.
Hoping many of you will come along and take advantage of the great deals.
Jean x
Sunday, 19 August 2012
Saturday, 19 May 2012
Temporary shop opening hours
As many of you know Roberts illness is getting worse, he was taken back in hospital again yesterday.
Due to this Gordon is not in the shop very often and has decided to open the shop between 10.30am and 2pm for the time being , still closing Tuesday and Sunday. We are sorry for any problems this may cause but I am sure you will understand.
Jean
Due to this Gordon is not in the shop very often and has decided to open the shop between 10.30am and 2pm for the time being , still closing Tuesday and Sunday. We are sorry for any problems this may cause but I am sure you will understand.
Jean
Friday, 6 April 2012
EASTER SHOP OPENING
Hi again everyone,
Due to Roberts illness, Gordon has decided to close from today until normal opening Wednesday.
I say normal, if Gordon is not available to come into the shop Karen and I will open between 10.30am and 3pm.
Sorry for any inconvienience.
Jean x
Due to Roberts illness, Gordon has decided to close from today until normal opening Wednesday.
I say normal, if Gordon is not available to come into the shop Karen and I will open between 10.30am and 3pm.
Sorry for any inconvienience.
Jean x
News on Robert
Just a few words to let you know that Robert has been taken into hospital after his condition worsened on Wednesday evening. Robert has allowed Gordon to post on the Once Upon A Stamp blog with more info and he will keep everyone upto date with whats happening.
Please keep both Robert and Gordon in your prayers.
Jean x
Please keep both Robert and Gordon in your prayers.
Jean x
Sunday, 26 February 2012
NEW SIZZIX IRONWORK FRAME CARD

I just loved this new sizzix ironworks frame, it has that Macintosh style to it.
I cut out the outer frame in grey card and fixed acetate down the side panels on the reverse side.I coloured all the spaces using pro markers so it gave a stained glass effect.
Using the two centre dies I cut one in orange foil card and the smaller one in yellow core card then matt and layered using foam tape, this was then layered onto the grey center cut from the main outer die. Placed the frame onto cream pearlised card and put the layered center in place.
I simply finished it off with a Marianne ballerina die.
Hope you enjoy what I have done, hugs Karen x
Thursday, 23 February 2012
Cameo

Couldn't resist the new Sizzix Framelits just had to give them a whirl.
I'm back to my black and white so a I felt a Cameo was needed, this one is a Marianne die.
Another quite easy card, I chose a black card base, matting and layering white then black. The framelit was cut in white, as was the smaller oval, the small swirls top and bottom of the frame are 'waste' from the frame.
The ribbons and buttons were from my stash.
All dies available from O.U.A.S
Enjoy Jean x
Wednesday, 15 February 2012
60th Birthday card
This card was my husbands, he celebrated his 60th Birthday last week.

To make the base card I used Go Create large die, cutting 2 and scoring 1/2inch from the long edge where I glued the 2 together. Cutting a futher 2 smaller sizes of the same die I used shades of green inks to shade edges of all pieces. The smallest of the 3 I also embossed using a Cuttlebug embossing folder to give a diamond effect, inking the inside of the folder before embossing.
When gluing the layers together I wrapped a piece of open hessian at an angle around the second layer to add a little texture.
The text plate was cut using Spellbinders Metal Tags and Accents, cutting twice, 1 from patterned paper, using the frame, and 1 in cream, using the centre, this one inked around the edges with gold and text stamped in gold. The text was done using Just Rite alphabets. The cream centre was sat in the patterned frame.
To make the embellishment in the bottom corner is a flattened Art Cap, (coming soon at Once Upon a Stamp with much more), with a photo of my husband, sized and cut to fit, finished off with apoxy dome.
Enjoy Jean x
Tuesday, 14 February 2012
A COUPLE OF HABERDASHERY CARDS
Thank you Jean for giving us a kick start and love your cards, hopefully between us there will be lots of different styles we will be able to show you.
For the square card I put about six different colours of Tim Holtz distress inks onto a stay put mat allowing some of them to overlap a little. Give a good spritz with water. I used Tim Holtz dressmakers dummy from the haberdashery stamp set and placed onto the ink then stamped onto white card you can do several images at this stage as each one will be different.
Setting this aside I picked up the rest of the ink using several pieces of white card as much or as little as you like and you are happy with the effect.
Taking the stamped image I used water colour pencils to highlight and define areas, distress the edges ink them up with distress inks taking colours from your image.
Next I embossed some parchment using the sissix dressmakers pattern folder and inked the whole area with black distressed ink then placed onto the front of the card.
Attached the stamped image to the left using sticky pads.
The reels are cut from Tim Holtz sewing room bigz die and wrapped thread around them and added a few buttom embellishments

For the second card used another stamped image as above but added some tiny gemstones around the neckline.
As you can see even though I used the some inks as above it is totally different. I layered this one on co ordinating card.
I used one of the inked up card from above and cut it to size to fit onto the left side of the folded card.
Onto this I stamped a couple of flourishes with distressed ink and quickly used distress embossing powder to give a lovely effect which does not show up very well on the picture then placed the stamped image to the right.

Black and White
Hi again,
 Been a few days but hope you like this card. I have really been into Black and White for awhile now so enjoyed doing this simple one.
Using Spellbinders Floral Doily Accents and Motifs I cut and embossed all elements in both black and white. To make up the medallion I chose alternative colour elements, but not using all I had cut. The border and corners I placed directly on a 6" square card base before centreing the made medallion.
I hope the second photo shows the medallion more clearly.
 As I had cut all elements in both colours I also made a similar card White on Black.
Enjoy Jean x

Using Spellbinders Floral Doily Accents and Motifs I cut and embossed all elements in both black and white. To make up the medallion I chose alternative colour elements, but not using all I had cut. The border and corners I placed directly on a 6" square card base before centreing the made medallion.
I hope the second photo shows the medallion more clearly.

Enjoy Jean x
Friday, 10 February 2012
Card for my Grand-daughter
Hi everyone
After talking to a customer the other week I decided I should start showing some of the cards I make.I have been busy since Christmas, trying to get infront with Birthday and anniversary cards so I can make an early start on Christmas, you may therefore see a mix as I'll post as I make them and when I have time.
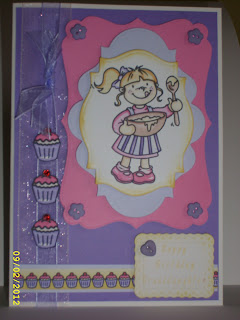
This one is for my grand-daughters 9th Birthday. I used Spellbinder dies for matting and layering and the image and cupcakes are from a My Craft Studio CD. I also used two widths of organza ribbon down the side tying a short piece around the narrower one then sticking the three individual cupcakes lower down. The cupcake boarder is smaller cupcakes made into a boarder on MCS. The text plate is again a Spellbinder, although the text does not show very clearly on the picture, I inked the edges of the text plate and image topper picking out a colour from the image. Buttons were added as another embellishment. Would love to hear your comments.
Hope to see you tomorrow Jean x
After talking to a customer the other week I decided I should start showing some of the cards I make.I have been busy since Christmas, trying to get infront with Birthday and anniversary cards so I can make an early start on Christmas, you may therefore see a mix as I'll post as I make them and when I have time.

Hope to see you tomorrow Jean x
Subscribe to:
Posts (Atom)